Roughing in a toilet is one of the most important steps in any bathroom construction or remodeling project. The term refers to the process of preparing the plumbing system before the toilet is installed. This includes positioning the drainpipe, waste line, water supply line, and flange in the correct locations according to building requirements and toilet specifications.
Many homeowners hear the phrase “roughing in a toilet” and assume it simply means placing a toilet in a bathroom. However, the rough-in stage occurs long before the toilet fixture is actually connected. During this phase, plumbers ensure that all underground and behind-the-wall plumbing components are correctly located so the final installation proceeds smoothly.
The rough-in measurement is especially important because toilets are manufactured to fit specific distances between the finished wall and the center of the drainpipe. If these measurements are incorrect, the toilet may not fit properly, resulting in expensive modifications and delays. Understanding roughing in a toilet can help homeowners make informed decisions during bathroom renovations and avoid common installation mistakes.
Whether you are building a new home, remodeling an existing bathroom, or replacing outdated plumbing, learning the basics of roughing in a toilet is essential. Proper planning at this stage can save significant time, money, and effort later in the project.
Understanding Standard Toilet Rough-In Measurements
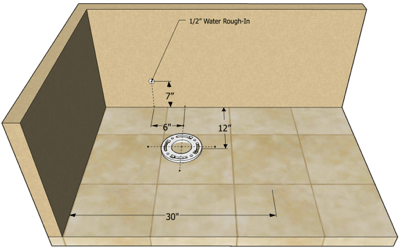
One of the most critical aspects of roughing in a toilet is determining the correct rough-in measurement. The rough-in dimension is measured from the finished wall behind the toilet to the center of the toilet drain or flange bolts.
The most common toilet rough-in measurement is 12 inches. Most residential toilets are designed around this standard dimension, making it the preferred option in modern construction. A 12-inch rough-in offers homeowners the widest selection of toilet models and styles.
However, not all bathrooms can accommodate a 12-inch rough-in. In older homes or compact bathrooms, 10-inch and 14-inch rough-ins are also common. A 10-inch rough-in is typically used when space limitations prevent a standard installation. A 14-inch rough-in may be found in larger bathrooms where the drain location is farther from the wall.
Accurate measurements are crucial because even a small discrepancy can affect toilet placement. Before roughing in a toilet, contractors should verify wall thickness, flooring materials, and final finishing dimensions to ensure precise positioning.
By understanding standard rough-in measurements, homeowners can confidently select compatible toilets and avoid installation complications.
Why Proper Roughing in a Toilet Matters
Proper roughing in a toilet affects the overall functionality, efficiency, and appearance of a bathroom. A correctly positioned drain and water supply line create a secure foundation for the toilet and help prevent future plumbing problems.
One of the main benefits of proper roughing in a toilet is leak prevention. When plumbing connections align correctly, seals remain tight and effective. Misaligned pipes or improperly positioned flanges can cause water leaks that damage flooring, subfloors, and surrounding structures.
Another important consideration is comfort. A toilet positioned too close to walls or fixtures may feel cramped and fail to meet building code requirements. Proper rough-in planning ensures adequate clearance around the toilet for comfortable use.
Correct rough-in work also simplifies future maintenance. Toilets installed according to standard dimensions are easier to repair, replace, or upgrade. Homeowners who choose standard rough-in measurements typically have more options when selecting replacement fixtures.
In addition, roughing in a toilet according to local plumbing codes helps ensure inspection approval and compliance with construction regulations. Failing to meet code requirements can result in costly corrections and project delays.
Ultimately, taking the time to properly rough in a toilet contributes to a safer, more reliable, and more efficient bathroom.
Essential Components Involved in Roughing in a Toilet
Several plumbing components work together during the rough-in stage. Understanding each part helps homeowners and contractors achieve a successful installation.
The toilet drainpipe is the primary component responsible for carrying waste away from the fixture. It connects to the home’s sewer or septic system and must be properly sloped to ensure efficient drainage.
The closet flange is another essential element. This fitting secures the toilet to the floor and creates a watertight seal between the toilet and drainpipe. During roughing in a toilet, the flange location must be accurately positioned to align with the fixture.
The water supply line delivers fresh water to the toilet tank. Plumbers typically install the shutoff valve several inches above the floor and slightly to one side of the toilet for easy access.
Vent pipes also play a critical role. Plumbing vents allow air to enter the drainage system, preventing pressure imbalances that could interfere with proper flushing and drainage performance.
Additional components may include pipe fittings, supports, cleanouts, and protective barriers designed to enhance system reliability and compliance with local building codes.
Each component must be installed carefully and accurately to ensure the plumbing system functions properly once the toilet is connected.
Step-by-Step Process of Roughing in a Toilet
The process of roughing in a toilet begins with planning and measurement. Contractors first determine the toilet location based on bathroom layout, code requirements, and fixture placement.
Once the location is established, plumbers mark the centerline of the toilet drain. This measurement serves as the foundation for positioning all related plumbing components.
The next step involves installing the waste pipe. The drain line is connected to the main sewer system and positioned according to the required rough-in distance. Proper slope is essential to facilitate effective waste removal.
After the drain line is installed, plumbers position the closet bend and flange connection. These fittings help direct waste into the drainage system while providing a secure mounting point for the toilet.
The water supply line is then routed to the designated location. A shutoff valve is installed to allow future maintenance and repairs without shutting off water to the entire house.
Vent pipes are added as required by local plumbing regulations. These vents help maintain proper airflow within the drainage system.
Following installation, the plumbing system is tested for leaks and functionality. Pressure tests and inspections verify compliance with building codes before walls and floors are closed.
Completing these steps correctly ensures a smooth transition to the final toilet installation stage.
Common Mistakes When Roughing in a Toilet
Even experienced homeowners can encounter challenges when roughing in a toilet. Several common mistakes can lead to costly repairs and installation difficulties.
One frequent error is measuring from unfinished walls instead of finished surfaces. Drywall, tile, and other finishes can alter dimensions significantly, resulting in an incorrect rough-in measurement.
Another mistake involves improper flange placement. The flange should sit on top of the finished floor rather than below it. Incorrect positioning can cause leaks and unstable toilet installations.
Poor drain slope is another common issue. Insufficient slope may lead to slow drainage and recurring clogs, while excessive slope can create waste separation problems.
Inadequate venting can also affect toilet performance. Without proper airflow, toilets may flush poorly or produce unpleasant odors.
Ignoring local building codes is another serious mistake. Code violations can delay inspections and require expensive corrections before project completion.
Careful planning, accurate measurements, and adherence to plumbing standards help prevent these issues and ensure a successful rough-in.
Building Code Considerations for Toilet Rough-Ins
Building codes establish minimum standards for plumbing safety and functionality. When roughing in a toilet, compliance with local regulations is essential.
Most codes require a minimum clearance of 15 inches from the center of the toilet to any side wall or obstruction. This creates adequate space for comfortable use and maintenance.
Front clearance requirements typically range from 21 to 24 inches, depending on jurisdiction. Larger clearances may be necessary for accessibility compliance.
Drain pipe sizing is another important consideration. Residential toilet drains generally require a minimum diameter of three inches, although some systems use larger pipes.
Vent requirements vary by location but must provide sufficient airflow to support proper drainage system operation.
Water supply connections must also meet code standards regarding materials, placement, and accessibility.
Before beginning any plumbing project, homeowners should consult local regulations and obtain necessary permits. Compliance helps ensure safety, reliability, and successful inspections.
Choosing the Right Toilet for Your Rough-In
Selecting the appropriate toilet is closely tied to rough-in dimensions. Choosing a toilet that matches the installed rough-in measurement eliminates fitting issues and simplifies installation.
Most manufacturers clearly specify rough-in requirements for their products. Homeowners should verify these specifications before purchasing a toilet.
Standard 12-inch rough-in toilets offer the greatest variety of styles, features, and price ranges. These models are widely available and generally easier to replace in the future.
For smaller bathrooms, 10-inch rough-in toilets provide a space-saving solution. Although options may be more limited, many manufacturers offer high-performance models designed specifically for compact spaces.
Bathrooms with 14-inch rough-ins can accommodate specialized toilet models or adapters, depending on the installation requirements.
Additional considerations include bowl shape, seat height, flushing technology, water efficiency, and overall design preferences.
Matching the toilet to the existing rough-in measurement helps ensure a professional-looking installation and optimal performance.
Cost Factors Associated with Roughing in a Toilet
The cost of roughing in a toilet can vary depending on project complexity, labor rates, and plumbing system requirements.
In new construction projects, roughing in a toilet is generally more affordable because plumbing systems are installed before walls and floors are completed. Contractors have easier access to work areas, reducing labor time.
Bathroom remodels often involve higher costs due to demolition, pipe relocation, and structural modifications. Moving a toilet to a new location can significantly increase expenses because drain and vent systems may require extensive alterations.
Material costs include drainpipes, fittings, flanges, supply lines, valves, and vent components. Higher-quality materials may increase upfront costs but often provide better long-term durability.
Permit fees and inspection costs should also be considered. Many jurisdictions require plumbing permits for toilet rough-in work.
Obtaining multiple estimates and developing a detailed project plan can help homeowners manage costs effectively while ensuring high-quality workmanship.
Tips for a Successful Toilet Rough-In Project
Successful roughing in a toilet begins with careful planning and accurate measurements. Taking the time to verify dimensions before cutting or installing pipes can prevent expensive corrections later.
Always measure from finished wall surfaces rather than framing members. This ensures the rough-in distance matches the toilet manufacturer’s specifications.
Use quality materials designed for plumbing applications. Durable components contribute to long-term reliability and reduce maintenance requirements.
Consult local building codes before beginning work. Understanding regulatory requirements helps avoid inspection issues and compliance problems.
Consider future maintenance needs when positioning shutoff valves and plumbing connections. Accessible components simplify repairs and upgrades.
If relocating a toilet, evaluate the impact on drainage slope, venting, and structural elements before making changes.
Finally, seek professional assistance when necessary. Complex plumbing modifications often benefit from the expertise of licensed plumbers who understand code requirements and installation best practices.
Conclusion
Roughing in a toilet is a foundational step in bathroom construction and renovation that directly impacts plumbing performance, comfort, and long-term reliability. From determining the correct rough-in measurement to installing drainpipes, flanges, water supply lines, and vents, every detail plays an important role in creating a functional bathroom.
Understanding standard rough-in dimensions, following building code requirements, selecting compatible fixtures, and avoiding common installation mistakes can make the entire process smoother and more successful. Whether working on a new construction project or updating an existing bathroom, careful planning and precise execution are essential.
By mastering the principles of roughing in a toilet, homeowners and contractors can ensure efficient plumbing performance, simplify future maintenance, and create a bathroom that serves its purpose effectively for many years to come.
Also read More Information: MMSBRE Complete Guide: Trends, Uses, and Insights


Guter Beitrag! VV ULTIMATUM unter / passt gut zu diesem Thema. VV ULTIMATUM